When it comes to difficult decisions, choosing between Roman vs Neapolitan Pizza for dinner is right up there with being honest about your Mom’s new haircut!
Among Italian-style pizzas, there are really two (or maybe three) styles people are familiar with: the classic Neapolitan pizza and the crispy, huge Roman style.
What is Roman vs Neapolitan Pizza?
(or should we be asking pizza romana vs napoletana)?
Roman pizza (or Pizza Romana) is also known as pizza al taglio – which literally translates to “by the cut” or “by the slice”. It also goes by pizza al metro (pizza by the meter) and pizza in pala (paddle pizza). This style of pizza hails from Rome and has a fascinating history dating back centuries – but still evolving today. It was (and generally still is) traditionally baked in rectangular pizza pans and sold in rectangular slices as a popular street food.
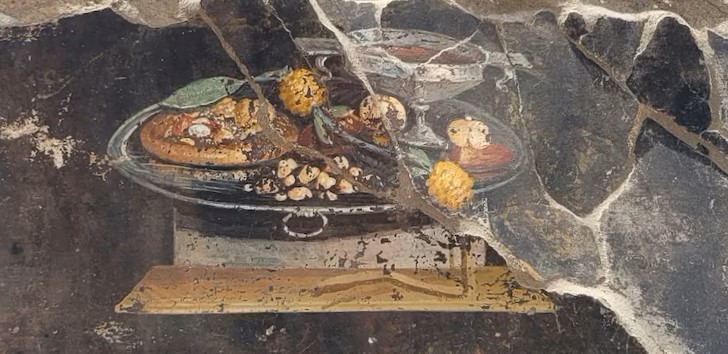
Neapolitan pizza (or Pizza Napoletana), on the other hand, originated in Naples and is believed to have been created in the late 18th century – although a recently discovered fresco was found in Pompeii caused a stir that maybe pizza’s origins may be date back to the first century AD! Then again, the Associated Press has also debunked that because tomatoes hadn’t been brought from the Americas yet.
Regardless of the date of its origin, pizza gained fame as a staple of the working-class diet, and its association with Naples’ vibrant culinary culture continues to this day.
What is Neapolitan Pizza?
Being “the original”, Neapolitan pizza has been recognized by UNESCO as one of Italy’s intangible cultural heritages. And as such, the Associazione Verace Pizza Napoletana (AVPN) sets a very high and specific bar for making the true original – Neapolitan pizzas and Neapolitan pizza doughs.
But the essence of Neapolitan pizza is that is made with San Marzano tomatoes, mozzarella cheese, and the dough is soft and chewy. The dough is made with fewer ingredients, including high-protein flour (typically 00), water, salt, and yeast. The dough is left to rise at room temperature for one day.
Because of the extremely high temperature of the pizza oven and the thin crust, Neapolitan pizza cooks in just (about) 4 minutes and gets the lovely “leopard spots”.

What Is Roman Pizza?
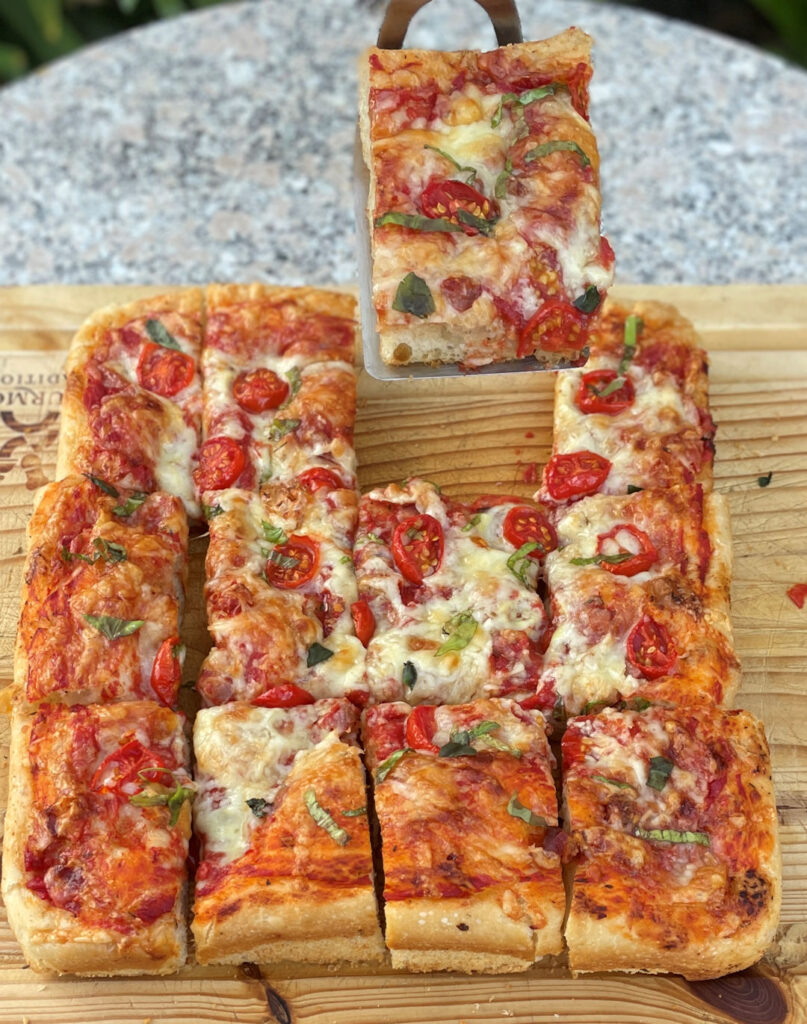
In contrast, Roman pizza is different in most every way – but in particular due to its crispy crust exterior. That crispy crust comes from the addition of olive oil allowing for higher hydration and typically cooking in a pan.

As told in episode 2 of Netflix Chef’s Table: Pizza, Roman pizza was generally thought to be “junk food” until reinvented by Gabriele Bonci. Bonci transformed Roman pizza through more passion about the ingredients and their quality.
Therefore, Roman pizza is less bound by tradition, and so there are more variations today. It can be thin or thicker (like focaccia), it isn’t always cooked in a pan, it can have a lot or a few toppings, a wild array of toppings, and sometimes it’s served at room temperature.
Roman pizza dough is often left to proof longer – sometimes up to 72 hours. These differences combine to result in the dough being richer, more pliable, crispy on the outside, and still chewy on the inside. Cooking in a pan also allows for more generous portions of toppings.
So What Should I Make? Neapolitan Pizza vs Roman Pizza?
Well, of course you’re not going to go wrong making either. Both pizzas are delicious!
But let’s look at some of the reasons you might make Roman vs Neapolitan pizza…
Reasons to Make Neapolitan Pizza
Some of the best reasons to choose Neapolitan pizza are:
- You have 2-4 people to serve (Neapolitan pizza is smaller)
- You have a very hot pizza oven
- You can cook it on a pizza stone
- You have 00 flour available
- You prefer simpler pizza with less toppings
- You like thin, chewy pizza crust
Reasons to Make Roman Pizza
Some of the best reasons to choose Roman pizza are:
- You have 4 or more people to serve (pizza party anyone?)
- You have a conventional oven
- You have bread flour available
- You love to load up your pizza with toppings
- You like a crispy pizza crust
- You have more time to proof your dough in advance
How to Make Neapolitan Pizza

Rather than include the same instructions here, if you’re ready to make true Neapolitan Pizza, you’ll want to go to our Neapolitan dough recipe article here. From there, you can choose from a number of Neapolitan pizza recipes for your topping choices. (The recipe card is also found at the bottom of this article).
How to Make Roman Pizza

Making Roman Pizza
The best Roman pizza is going to require a long proofing time. If you can give your pizza 72 hours to cold ferment, you’re going to wind up with a delicious, airy pizza that’s still beautifully crispy. This recipe will still work with shorter proofing times, but if you can plan in advance – go for the full three days.
Ingredients You’ll Need

This recipe makes a 13″ x 9″ pizza (standard cake pan), which is pretty much exactly the same size as 13″ round pizza.
- 2 1/2 cups of bread flour
- 1 cup of warm water (no higher than to 110°F)
- 1 teaspoons of active dry yeast
- 1 teaspoon of salt
- 6 teaspoons of extra virgin olive oil, divided into 3 tsp/2 tsp/1 tsp
- Toppings of your choice; suggested:
- 1/2 cup of crushed tomatoes (or pizza sauce)
- 1 clove of fresh garlic, sliced or grated
- 3 ounces of artichoke hearts, drained and chopped
- 8 basil leaves
Directions
- In a stand mixer bowl, put the water and add the yeast. Allow to mix for 5 minutes so that foam appears
- Add 1 cup of flour and 3 teaspoons of olive oil and let stand for an additional 5 minutes
- Turn on the stand mixer on its lowest setting and add the salt.
- Slowly add 1 cup of flour until the dough comes together in a uniform ball. If necessary, continue adding flour slowly until the ball is uniform.
- Either cover the bowl in plastic wrap or remove the dough and place in a sealed container to proof.
- If eating the same day, allow at least 1 hour of proofing at room temperature. If eating in 2-3 days, let proof at room temperature for 1 hour before transferring to the fridge.
- When ready to form the dough, make sure it is at room temperature (if it has been refrigerated, you should give it at least 45 minutes to come to temperature).
- Use 2 teaspoons of olive oil to oil your pizza pan or baking sheet.
- Lightly flour a work area where you can stretch out the dough.
- Gently stretch the dough out into a rectangular shape. Don’t over work the dough. Try to preserve the pillowy, airy texture.
- Gently transfer the dough into the oiled pan.
- Oil your fingers and gently “pillow” (press like you’re playing the piano) the dough to cover the entire pan. Again, try to preserve the airy texture but also trying to get the dough evenly distributed across the pan.
- Use a brush to distribute 1 teaspoon of olive oil across the pizza ensuring to cover the outer edges.
- Let the dough rest and “puff” up for another 20 minutes
- Preheat your oven to 450°F
- Using your fingers, gently pillow any high parts of the dough.
- Add your sauce, toppings, then cheese.
- Bake in the oven for 7 minutes, then rotate the pan.
- Bake for another 7 minutes.
- Remove the pan and let stand for 5 minutes.
- Use a spatula to transfer the pizza to a cutting board.
- Traditionally, Roman pizza is cut using scissors but of course you can use a pizza cutter or knife.

The Final Word: Pizza Romana vs Napoletana
No matter which you make, it’s going to be pizza – so you can’t really go wrong! But whereas Neapolitan is more traditional, it is more difficult, requires a pizza oven, and serves fewer people. Roman pizza is definitely easier to make and serves more people. If you’re not sure, why not start with the Romans today?

Roman Pizza (Pizza al Taglio)
Equipment
- 1 Pizza Pan
- 1 Stand Mixer Optional
Ingredients
- 2 ½ cups bread flour
- 1 cup warm water no higher than to 110°F
- 1 teaspoon active dry yeast
- 1 teaspoon salt
- 6 teaspoons extra virgin olive oil divided (3/2/1)
Toppings of your choice; suggested:
- ½ cup crushed tomatoes or pizza sauce
- 1 clove fresh garlic sliced or grated
- 3 ounces artichoke hearts drained and chopped
- 8 basil leaves
Instructions
Prepare the Dough
- In a stand mixer bowl, put the water and add the yeast. Allow to mix for 5 minutes so that foam appears

- Add 1 cup of flour and 3 teaspoons of olive oil and let stand for an additional 5 minutes
- Turn on the stand mixer on its lowest setting and add the salt.
- Slowly add 1 cup of flour until the dough comes together in a uniform ball. If necessary, continue adding flour slowly until the ball is uniform.
- Either cover the bowl in plastic wrap or remove the dough and place in a sealed container to proof.
- If eating the same day, allow at least 1 hour of proofing at room temperature. If eating in 2-3 days, let proof at room temperature for 1 hour before transferring to the fridge.


Forming the Dough
- When ready to form the dough, make sure it is at room temperature (if it has been refrigerated, you should give it at least 45 minutes to come to temperature).
- Use 2 teaspoons of olive oil to oil your pizza pan or baking sheet.
- Lightly flour a work area where you can stretch out the dough.
- Gently stretch the dough out into a rectangular shape. Don’t over work the dough. Try to preserve the pillowy, airy texture.
- Gently transfer the dough into the oiled pan.
- Oil your fingers and gently “pillow” (press like you’re playing the piano) the dough to cover the entire pan. Again, try to preserve the airy texture but also trying to get the dough evenly distributed across the pan.
- Use a brush to distribute 1 teaspoon of olive oil across the pizza ensuring to cover the outer edges.
- Let the dough rest and “puff” up for another 20 minutes
- Preheat your oven to 450°F
- Using your fingers, gently pillow any high parts of the dough.
- Add your sauce, toppings, then cheese.

Baking Instructions
- Bake in the oven for 7 minutes, then rotate the pan.
- Bake for another 7 minutes.
- Remove the pan and let stand for 5 minutes.
- Use a spatula to transfer the pizza to a cutting board.
- Traditionally, Roman pizza is cut using scissors but of course you can use a pizza cutter or knife. It's Italian name is Pizza al taglio, which translates to pizza by the slice!

Notes
Nutrition

Neapolitan Pizza Dough Recipe
Equipment
- 1 Stand Mixer (Optional)
- 1 Wood-burning pizza oven AVPN says this is required, but use what you've got!
Ingredients
- .75 Cups Water Tap, filtered or bottled drinking water. Do not use reverse osmosis purified water.
- 1 ½ Tsp Sea salt
- 2 Cups 00 Pizza Flour
- 0.01 Ounces Dry yeast (1/2 of 1/8 Teaspoons)
- 2 Tbsp Semolina flour (if you don't have semolina, any flour will do, including 00 or all-purpose)
Instructions
- Pour the water into the mixing bowl of a stand mixer. Pour the salt into the water and whisk (or stir) until the salt is dissolved.Add about 1/4 cup of flour into the water.
- Start your stand mixer using the hook attachment on its slowest setting.
- Add the yeast to the water.
- Slowly add more flour. Not all flour hydrates the same, so it may be that you'll need a little less or a little more flour.
- If you don't have a stand mixer, you can do this all by hand. Just make a "volcano" of all of the flour and pour the water into the middle. Slowly move and mix the "volcano" walls into the water.

Checking the Dough
- The dough will form into a single compact ball.· When this happens, stop the mixer and check the texture. · Dust your hands with flour and pull the dough off of the hook. · Knead the dough in your hands. · The texture and moistness should be consistent throughout. If it is not, return it to the mixer and check again. · The dough should be slightly tacky and smooth but should not be leaving much sticking to your hands. If it is, return it to the mixer and continue adding flour – slowly. · The final dough ball should be "fat" in appearance and sticky, soft, elastic, and smooth to the touch.

First Fermentation
- Place the dough on a clean surface and cover with a damp cloth for one hour. The damp cloth is important to keep the outer surface from drying out.

Second Fermentation
- Remove the damp cloth and separate the dough into two balls of equal size (this recipe will make two dough balls approximately 9.5 to 9.9 ounces – which is right at the upper size limit).
- Work the two halves into balls (the traditional technique is to shape them the same way Italians prepare fresh mozzarella balls).
- Place the two balls into one or two sealed containers – the dough balls will double in size, so make sure they have enough room.
- Let the dough rest for 24 hours at room temperature.

Stretching the Dough
- After the second fermentation, the dough will have become extensible (meaning you can stretch it) but not very elastic.
- Put 1 tablespoon of flour on your work surface. Some people prefer to use semolina flour for this but I just use the same flour my dough is made from.
- Remove one dough ball from its container onto the floured work surface.
- Stretch the dough by hand from the center to the edge. Create a round shape but ensure that the edge of the crust is about 0.5" tall and 0.5" to 1" wide and the rest of the crust is very thin (less than two pennies, if you can).(If needed, add more flour to the work surface so the pizza does not stick, but do not use more than you need)
- With this recipe (which makes two 9 ounce pizza dough balls), you should be able to make up to a 12" pizza.
- Put 1 tablespoon of flour (semolina is often a good choice) on your pizza peel (so the dough will not stick when launched into the oven). I don't recommend using cornmeal at such hot temperatures.
- Transfer your dough to the pizza peel.
- You will want to quickly apply your toppings and get the pizza into the oven before the dough sticks to the peel.
- Launch the pizza into the oven on the hottest part of the stone without being in the flames.
- Before rotating the pizza, make sure that Rotate the pizza one quarter turn every 45 seconds. Generally, the pizza will be done in 6 minutes or less. So watch it closely!
- Remove the pizza from the oven and let it rest for about 3 minutes.
- Cut and serve immediately.


Notes
- If you are going to cook this in a conventional oven, you’ll want the highest temperature you can get the oven to.
- If you have a pizza stone (or pizza steel), that’s going to help a lot in getting the most authentic crust. If not, a pizza pan (or cookie sheet) will still turn out a great pizza.
- You can either start the pizza on a pan (or cookie sheet) and transfer it to the stone after about 10 minutes (when the crust is firm enough to be safely transferred). At this point, turn off the oven and let the pizza cook on the stone for another 5 minutes. Remove and let rest on a cutting board for another 5 minutes before cutting and serving.
- Alternatively, you can start by launching the pizza directly to the pizza stone in your oven. This is more tricky and you might want to practice with some dough with no toppings!
- 5 fluid ounces of water
- 1 tsp salt
- 1.5 cups plus 2 tbsp of type 00 flour
- 1/2 of 1/8 teaspoons of yeast
Nutrition

Todd’s cooking skills have revolved around the grill since about age 12, when he developed a love for grilling and took over for Mom at the BBQ. He worked at Wendy’s and at Earl’s Tin Palace (a restaurant chain in Canada) but never really did any sort of baking…until he and Heather started making pizza together! Now he’s often making dough in the mornings and pizza in the evenings.
This pizza is great. I like the thicker chewy crust and the choice of toppings.