Use the words “Italian pizza” and many people think of the classic Neapolitan pizza. But Italy is famous for more than just the pizza from Naples. Pizza Sicilia or Sfincione Siciliana (which is traditional Sicilian pizza) is also one of the classic and most delicious pizzas. Let’s do a deep dive into this deep dish!
The land of Italy, rich with history and culinary wonders, has gifted the world with an array of delightful dishes – and we all know the most iconic (and delicious) of Italian exports is pizza! But there’s more than just the infamous Neapolitan pizza to enjoy. In so many ways, Pizza Sicilia has so much to offer our palettes.
What is Pizza Sicilia?
(also known as Sicilian Pizza, Pizza Siciliana, or Sfincione Siciliana)
Sicilian pizza (the direct translation of Pizza Siciliana) (or “Sfincione” or “Sfincione Siciliana” in its homeland – which literally translates to “thick sponge”) finds its roots in Palermo, Sicily and was popularized in the mid-19th Century. Some (especially some Sicilians) might say that they aren’t Italian at all (they do have their own language) and therefore, they could even argue that this pizza isn’t Italian either.
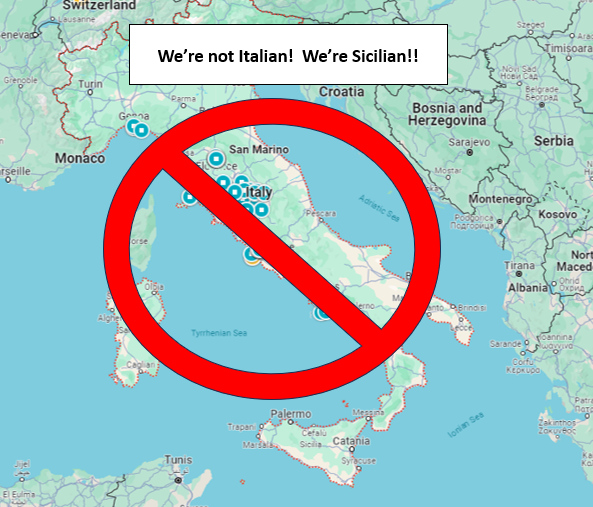
We’ll leave that debate to those who live in Italy…or Sicily…err…you know what I mean!
What’s Special About Pizza Sicilia?
Sicilian pizza is rather unique from the “original” in almost every way. This style evolved from ancient civilizations’ bread traditions that occupied Sicily, including Greeks, Romans, and Arabs.
Traditional Sicilian pizza generally has a thick crust, is typically rectangular (but doesn’t have to be), uses pomodoro di Pachino (or Pachino tomatoes) which can come in four varieties, including cherry and grape tomatoes. Alternatively, Sicilian pizza sauce may be made from Rosso Sicilian tomatoes, which appear to be only available in the US by growing them yourself! But these unique heirloom tomatoes appear to be a great choice for a sauce.
Sicilian pizzas are then generally topped with strong, savory ingredients like onions, anchovies, and strong cheeses like toma or caciocavallo (aka horse cheese, even though it doesn’t come from horses!). Often, they have less cheese than we find on an American-style pizza.
Sicilian pizza is also baked at a lower temperature (and therefore longer) and commonly “tavern cut” into squares or rectangles (which does make it very nice for a pizza party!).

The American Evolution
Sicilian pizza did undergo a bit of an evolution when coming across the Atlantic Ocean to America, where we generally find the toppings to be tomato sauce, mozzarella cheese, and a wide variety of toppings. It’s akin to a focaccia-crust pizza loaded with toppings.
Reasons to Make Pizza Sicilia
Some of the best reasons to choose Sicilian pizza are:
- You have 4 or more people to serve (pizza party anyone?)
- You have a conventional oven and a baking pan/sheet
- You have high protein flour available (generally recommended to be 13%-14%)
- You love to load up your pizza with toppings
- You have cherry, grape, or heirloom tomatoes (or sauce) – preferably with a savory flavor (so no sugar!)
- You like strong cheeses like caciocavallo, toma, or provolone
- You like a crispy pizza crust
- You have more time to proof your dough in advance
How to Make Pizza Sicilia
Making Sicilian Pizza
The best Sicilian pizza is going to require a long proofing time. If you’ve got the patience to give your pizza the 48+ hours it needs to proof properly, you’re going to wind up with a delicious, airy pizza that’s still beautifully crispy.
Sicilian Pizza Ingredients
Sicilian dough contains similar ingredients to its Neapolitan counterpart, but is allowed to rise multiple times, leading to a thicker, bread-like crust. It’s reminiscent of focaccia, and when baked in a nice, well-oiled baking tray/pan, the bottom gets crispy while the inside remains soft.
Sicilian pizza uses a high-protein (or high-gluten flour). You’ll probably find great results using King Arthur’s High-Gluten Flour, which has a 14.2% protein level. As with most other pizza doughs, you’ll also need water and salt and you can either use yeast or a pizza starter, such as poolish. Since it’s already two days to get this pizza ready, we’re going to go with yeast.
You’re also going to need olive oil for this pizza to get its crispy outer edge.
Our recipe is going to fit a standard baking (cookie) sheet of 10″ x 15″. Generally, you would want a pan at least an inch tall on the sides, but we’re making this work for the most common house-hold pan.
- 3.5 cups of high-protein (high-gluten) flour
- 1/3 cups of filtered or bottled water, luke-warm (below 110F)
- 1 cup of filtered or bottled ice water
- 1/2 tablespoons of dry active yeast
- 2 teaspoons fine salt
- 1.5 tablespoons olive oil, separated
Pizza Toppings: Traditional Sicilian

Although you can make a Sicilian Pizza with any toppings you like, the classic from the toe of the boot typically include:
- 1 cup cooked tomato sauce with fresh crushed, savory cherry, grape, or heirloom tomatoes (or tomato sauce without sugar)
- 1 ounces of anchovies, cut into quarters
- 1/4 of a red onion
- 2 tablespoons of Pecorino Romano
- 1 teaspoon of dried oregano
- 1 tablespoon of olive oil
Other Topping Options
Just like pizza anywhere, personal preferences, location, and time all influence what might go on a pizza. Here are a few other options you can experiment with:
- 1 cup of caciocavallo or toma cheese (an easier to find substitute is provolone). Note that melted cheese like this often goes under the tomato sauce.
- 1/4 cut chopped, fresh basil (or 2 teaspoons of dried basil)
- An extra drizzle of olive oil on top
Directions for Making Sicilian Pizza
Day 1: Preparing the Dough
- Put a small dish of water near your work area to wet your hands as needed.
- In a stand mixer bowl, put in the warm water and add the yeast and whisk. Allow to mix for 5 minutes so that foam appears.
- Add 1 cup of flour and mix in the stand mixer at its slowest setting.
- Add the cold water and continue to mix.
- Slowly add the rest of the flour. The dough will still be very sticky and will not look very smooth yet.
- Wet your hands and pull the dough off of the hook
- Add the salt and continue to mix for another 1 minute
- Add 1 teaspoons of olive oil and continue to mix. You may need to stop the mixer and pull the dough from the hook occasionally to ensure the dough is mixing well.
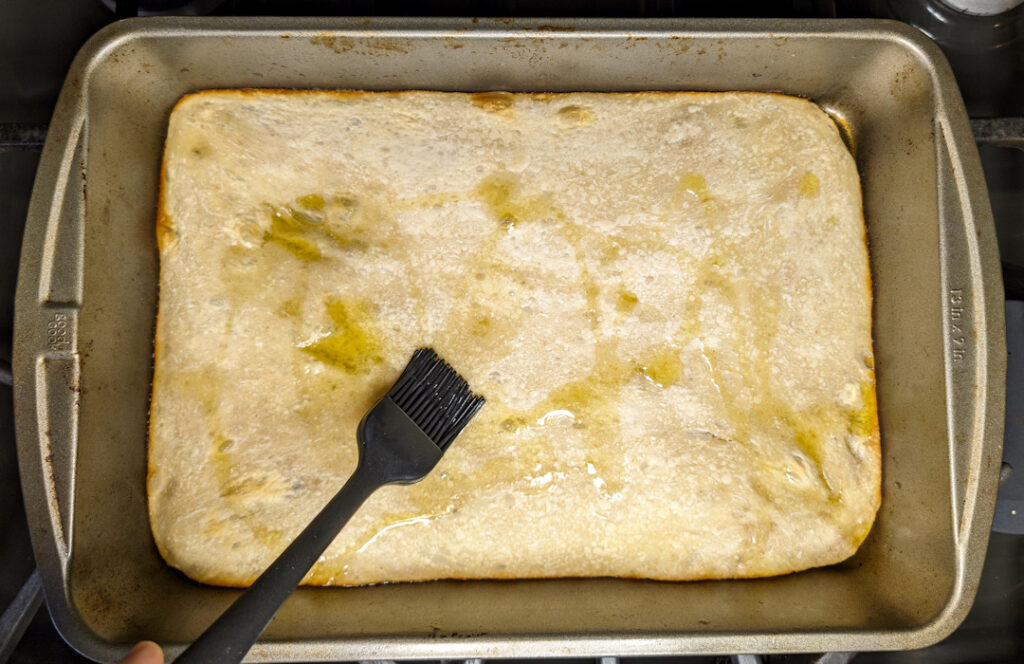
- Use a brush to coat a baking pan with 1 teaspoon of oil.
- Wet your hands and transfer the dough to the baking pan.
- Re-wet your hands.
- Stretch the dough by pulling it left and right, then fold the stretched parts on top.
- Turn the pan a quarter turn and repeat. It will look like an envelope.
- Fold the corners into the center and pinch together.
- Turn over the dough using your wet hands and smooth the edges.
- Cover the pan in plastic wrap and let the dough rest for 20 minutes.
- Place the covered pan in the refrigerator for 24 hours.
Day 2: Finishing the Dough
- Remove the dough from the refrigerator and allow it to warm up for 1 to 2 hours on the countertop.
- Use a brush to oil the second cake pan with another 1 tablespoon of olive oil.
- Optional: this doesn’t seem to be a truly authentic step, but I encourage stealing a trick from the Detroit pizza – butter the second cake pan BEFORE adding the oil. If you do this, you can use just 1/2 tablespoon of oil.
- Invert the first pan and allow the dough to fall from the first pan onto the second. The dough will still be very sticky, so use a wetted spatula or dough scraper if it does not completely come away by itself.
- Flip the dough over so both sides are oiled.
- Gently using the fingers of both hands, press the dough outward (not pulling) to stretch the dough towards the edges of the baking sheet. The dough won’t likely get all the way to the edges this first time. Don’t tear the dough trying to get to the edges, but try to get it about the right shape of the pan.
- Let the dough rest uncovered in a warm space away from any draft for 30 minutes. The dough will contract but it will also start expanding.
- Repeat the stretching. Gently stretch the dough out but don’t over work the dough. Try to preserve the pillowy, airy texture. Again, try to stretch the dough to the corners – it will still likely not reach the corners completely.
- Let the dough rest uncovered again in a warm space, away from any draft for 90 minutes. The dough should rise to the edge of the pan and fill it entirely now. Even if it doesn’t, do not stretch or press the dough again.


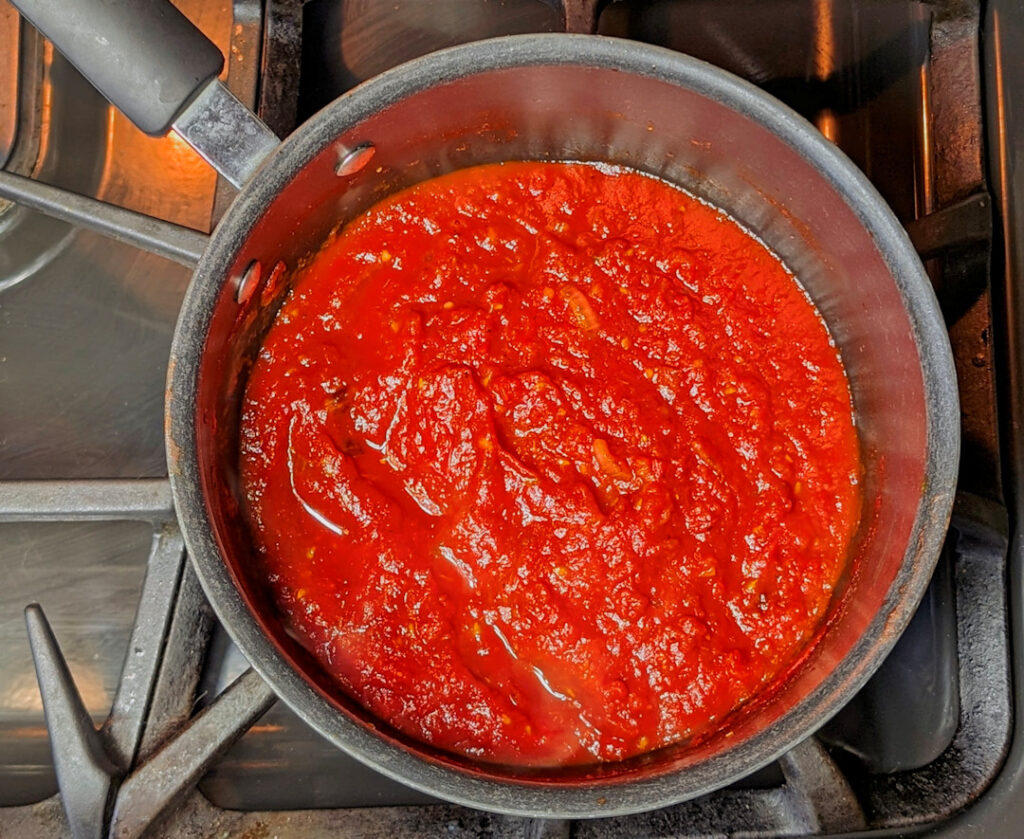
Making Sfincione Pizza Sauce
Unlike a lot of pizza sauces, Sicilian sfincione pizza sauce is cooked. This can be done while the dough is doing its final rise.
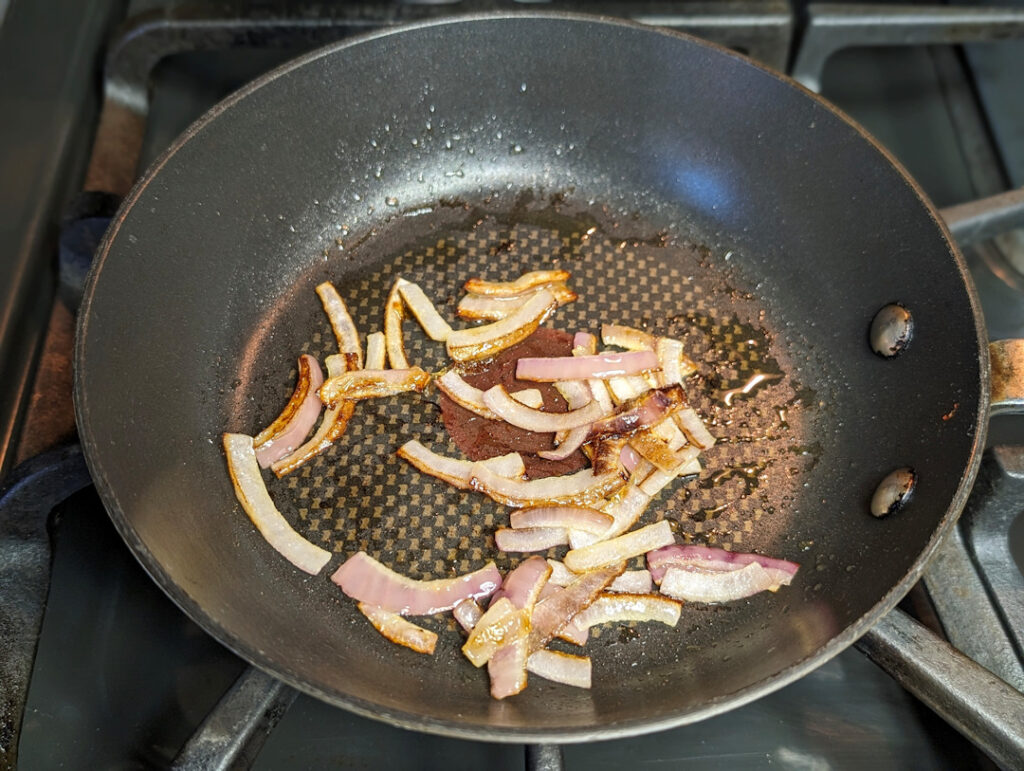
- Slice about 1/4 of the red onion into rings and quarter them. Slice the rings into quarters. Set aside the larger pieces for topping the pizza later and use the smaller pieces for in the sauce.
- Sautee the smaller onion pieces in a splash of olive oil until the purple color softens and the onions have browned a little – about 5 minutes. Don’t over cook.
- Hand crush the canned whole tomatoes and the fresh tomatoes into a pot. While doing this, cover your hand and the pot with a towel to control the splatter.
- Add the sauteed onions and the seasonings for the sauce to a pot or pan on low heat.
- Stir the sauce and simmer for 30 minutes. Periodically, stir the sauce and use the spoon to further break down the tomatoes. If you like the sauce to be very consistent, you can use an immersion blender, but it is not necessary.
Cooking the Pizza Sicilia
- Preheat your oven to 450°F.
- Bake in the oven for 7 minutes, then rotate the pan and remove from the oven.
- Use a basting brush to spread a thin layer of olive oil over the top of the crust.
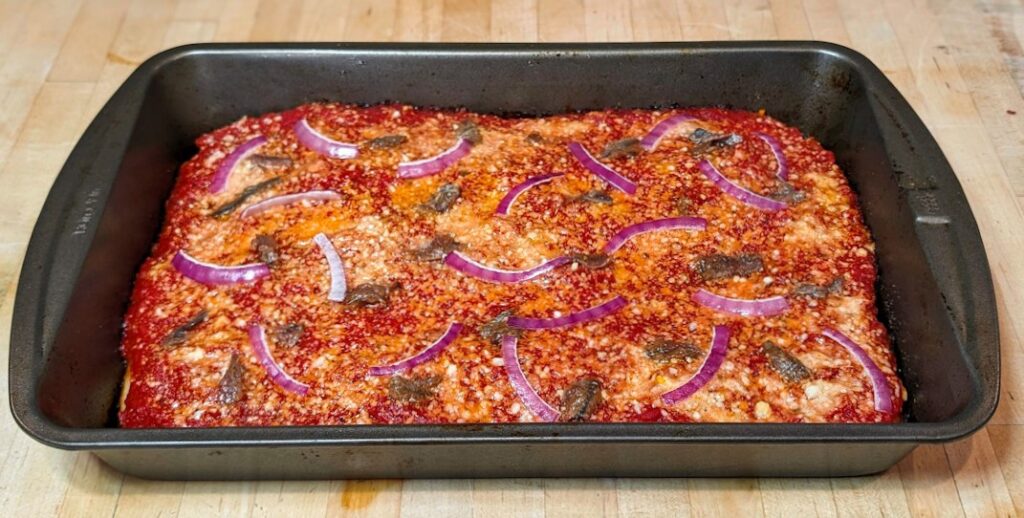
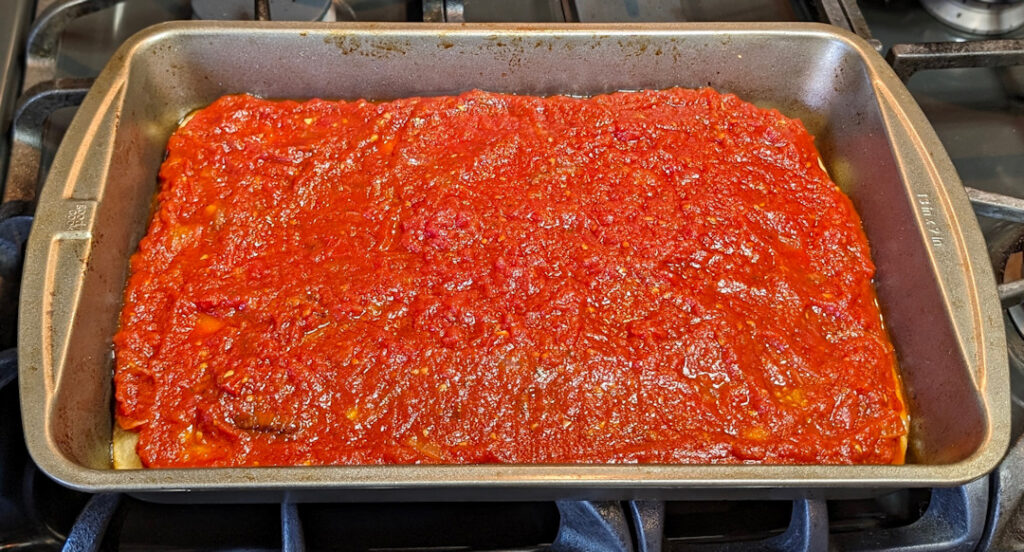
- Distribute the sauce over the pizza dough. Use a large spoon to spread it evenly.
- Break the anchovies into halves (or smaller) and distribute over the top of the sauce.
- Sprinkle the Romano Pecorino cheese over the top.
- Add the rest of the raw red onion on top.
- Return the pizza to the oven and bake for another 7 minutes.
- Remove the pan and use a spatula to transfer the pizza to a cutting board.
- Let stand for 5 minutes.
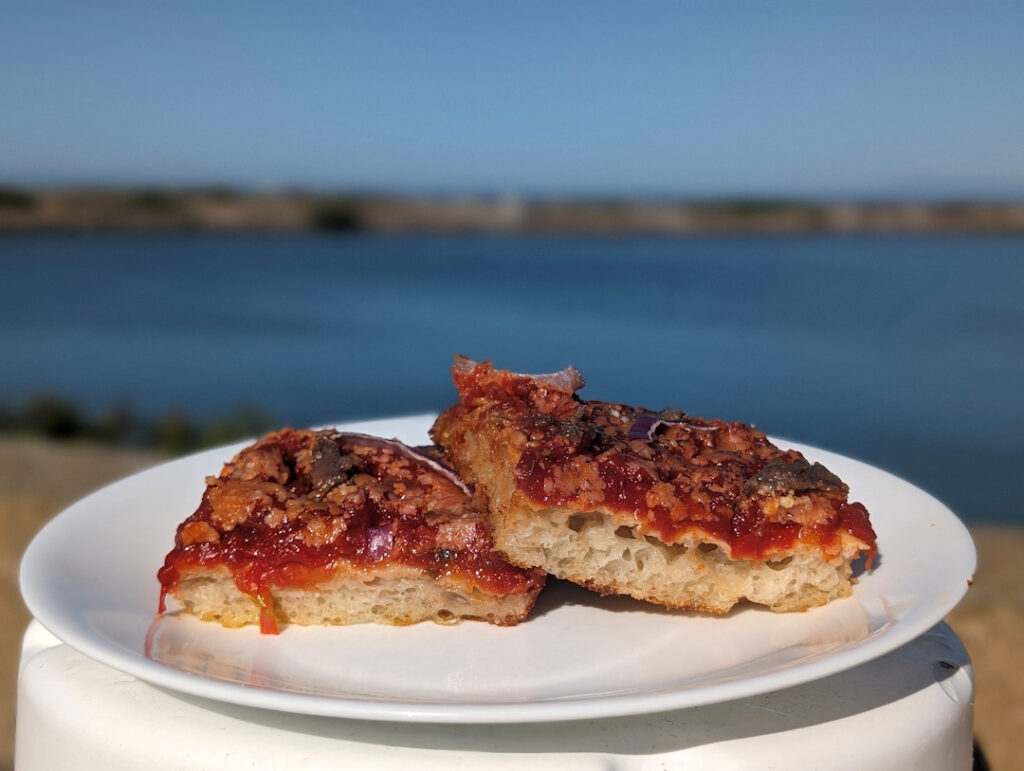
- Sicilian pizza is generally cut “tavern style”, meaning into squares or rectangles.
Tips and Tricks for Pizza Sicilia
One of the most important parts of this pizza is both a long, cold ferment of the dough followed by another room temperature ferment to get the dough to fill the pan and have lots of poof. Patience is an important virtue here – plus gentle handling. If the dough doesn’t quite fill the pan, don’t compromise the airiness by squishing it out to the edges. If you’ve got time, let it ferment a little longer in a warm place. If not, it’s still going to be delicious!
Deep dish pizzas can also have a tendency to stick to the bottom of the pan. This can happen if you don’t use enough oil or, in a very shiny pan that’s not seasoned. Some pizzaiolos recommend using shortening instead of oil or buttering and then oiling (like for a Detroit pizza). I am always trying to balance health, so I often use less oil…then regret it! I have found that getting the spatula under the pizza immediately after pulling it out of the oven can help separate better than waiting for it to cool down. But, if you are using a dedicated cake pan, I do think the butter-then-oil trick is the best.
Go Forth and Go Deep
Pizza Sicilia is more than just another deep dish pizza. Biting into a slice of traditional Sfincione is an experience that will take you straight to Sicily. And in making it yourself, you can see how Sicilians are a little different than mainland Italians and how they have adapted this dish for their own with a nicely crispy bottom and sides with a soft and airy center. The thick crust pairs beautifully with the rich flavors of its toppings which are generally more potently flavorful than most American pizzas – even American-Sicilian pizzas!
So enjoy a little deviation from what most people think of when making pizza!

Sicilian Grandma Pizza Recipe
Equipment
- 2 Baking Pans (At least one needs to be a 15" x 10" Baking/cookie sheet)
- 1 Pizza Scissors (Optional)
Ingredients
- 2.5 cups bread flour (high high protein)
- ¼ cups water warm – no higher than 110°F (filtered/bottled preferred)
- 1 cup water ice water (filtered/bottled preferred)
- 1 teaspoon dry active yeast
- 2 teaspoons salt fine
- 1 ½ tablespoons extra virgin olive oil divided into 3x 1/2 tablespoons
Grandma Pizza Toppings
- 1 cup tomato sauce crushed or pureed. Savory cherry tomatoes preferred.
- 2 cups provolone cheese grated (caciocavallo or toma is more traditional)
- 1 teaspoon oregano dried
- ¼ cup basil leaves fresh, chopped (or 2 teaspoons of dried)
Instructions
Day 1: Starting the Dough
- Put a small dish of water near your work area to wet your hands as needed.
- In a stand mixer bowl, put in the warm water and add the yeast and whisk. Allow to mix for 5 minutes so that foam appears.
- Add 1 cup of flour and mix in the stand mixer at its slowest setting.
- Add the cold water and continue to mix.
- Slowly add the rest of the flour. The dough will still be very sticky and will not look very smooth yet.
- Wet your hands and pull the dough off of the hook
- Add the salt and continue to mix for another 1 minute
- Add 1 teaspoons of olive oil and continue to mix. You may need to stop the mixer and pull the dough from the hook occasionally to ensure the dough is mixing well.
- Use a brush to coat a baking pan with 1 teaspoon of oil.
- Wet your hands and transfer the dough to the baking pan.
- Re-wet your hands.
- Stretch the dough by pulling it left and right, then fold the stretched parts on top.
- Turn the pan a quarter turn and repeat. It will look like an envelope.
- Fold the corners into the center and pinch together.
- Turn over the dough using your wet hands and smooth the edges.

- Cover the pan in plastic wrap and let the dough rest for 20 minutes.
- Place the covered pan in the refrigerator for 24 hours (up to 48 hours).


Day 2: Finishing the Dough and Making the Pizza
- Remove the dough from the refrigerator and allow it to warm up for 1 to 2 hours on the countertop.
- Use a brush to oil a second baking sheet with another 1/2 tablespoon of olive oil.
- Invert the first pan and allow the dough to fall from the first pan onto the second. The dough will still be very sticky, so use a wetted spatula or dough scraper if it does not completely come away by itself.
- Flip the dough over so both sides are oiled.

First Stretch
- Gently using the fingers of both hands, press the dough outward (not pulling) to stretch the dough towards the edges of the baking sheet. The dough won’t likely get all the way to the edges this first time. Don’t tear the dough trying to get to the edges, but try to get it about the right shape of the pan.
- Let the dough rest uncovered in a warm space away from any draft for 30 minutes. The dough will contract but it will also start expanding.

Second Stretch
- Oil your fingers and gently “pillow” (press like you’re playing the piano) the dough to cover the entire pan. Try to preserve the airy texture but also trying to get the dough evenly distributed across the pan. It will still likely not reach the corners completely.
- Let the dough rest uncovered again in a warm space, away from any draft for 90 minutes. The dough should rise to the edge of the pan and fill it entirely now. Even if it doesn’t, do not stretch or press the dough again.


Cooking the Pizza
- Preheat your oven to 450°F. If you have a pizza stone big enough, you can cook the pizza in the pan on top of the pizza stone.
- Add your sauce, toppings (except the basil), then cheese.
- Bake in the oven for 7 minutes, then rotate the pan.
- Bake for another 7 minutes until the top of the crust is golden and the cheese is browning.
- Remove the pan and let stand for 5 minutes.
- Use a spatula to transfer the pizza to a cutting board.
- Add the basil.
- Sicilian pizza is generally cut “tavern style”, meaning into squares or rectangles.


Notes
Nutrition

Todd’s cooking skills have revolved around the grill since about age 12, when he developed a love for grilling and took over for Mom at the BBQ. He worked at Wendy’s and at Earl’s Tin Palace (a restaurant chain in Canada) but never really did any sort of baking…until he and Heather started making pizza together! Now he’s often making dough in the mornings and pizza in the evenings.