Neapolitan Sourdough Pizza Dough Recipe
AVPN approved recipe for Neapolitan Sourdough Pizza Dough - makes two AVPN dough balls about 9.5 ounces each.
Equipment
- 1 Stand Mixer (Optional)
- 1 Wood-burning pizza oven AVPN says this is required, but use what you've got!
Ingredients
- 6 Ounces Water This is for the sourdough. Tap or bottled drinking water are ideal.
- 6 Ounces Flour This is for your sourdough and you can use flour of your choice. Many people prefer whole wheat flour for sourdough.
- .75 Cup Water Tap, filtered, or bottled drinking water are ideal.
- 1 ½ Tsp Sea salt
- 2 Cups 00 Pizza Flour
- 2 Tbsp Semolina flour (if you don't have semolina, any flour will do, including 00 or all-purpose)
Instructions
Making the Sourdough Starter
- Day 1: Add 1 ounce of filtered or bottled water to an 8 ounce mason jar. Add 1 ounce of flour of your choice (type 00 or bread flour are the most common). Stir with a butter knife so that you can scrape it on the edge.Cover with a lid and store at room temperature out of sunlight (cupboard is great).
- Day 2: Split the starter in two. Discard half (or start a second) and feed the remaining half:· Add 1 ounces of water.· Add 1 ounces of flour.· Stir.· Cover and store again at room temperature.
- Day 3: Repeat steps from Day 2.
- Day 4: Repeat steps from Day 2.
- Day 5: The starter should be bubbling and doubling in size each day, indicating it is fermenting well.You now should have about 4 ounces of sourdough starter and can either 1) make your dough now or 2) split the dough once more and keep and feed BOTH halves and make your dough tomorrow.
Making the Dough
- Pour the water into the mixing bowl of a stand mixer. Pour the salt into the water and whisk (or stir) until the salt is dissolved.Add your sourdough starter.Add about 1/2 cup of flour into the water.
- Start your stand mixer using the hook attachment on its slowest setting.
- Slowly add more flour. Not all flour hydrates the same, so it may be that you'll need a little less or a little more flour.
- If you don't have a stand mixer, you can do this all by hand. Just make a "volcano" of all of the flour and pour the water into the middle. Slowly move and mix the "volcano" walls into the water.
Checking the Dough
- The dough will form into a single compact ball.· When this happens, stop the mixer and check the texture. · Dust your hands with flour and pull the dough off of the hook. · Knead the dough in your hands. · The texture and moistness should be consistent throughout. If it is not, return it to the mixer and check again. · The dough should be slightly tacky and smooth but should not be leaving much sticking to your hands. If it is, return it to the mixer and continue adding flour - slowly. · The final dough ball should be "fat" in appearance and sticky, soft, elastic, and smooth to the touch.

First Fermentation
- Place the dough on a clean surface and cover with a damp cloth for one hour. The damp cloth is important to keep the outer surface from drying out.

Second Fermentation
- Remove the damp cloth and separate the dough into two balls of equal size (this recipe will make two dough balls approximately 9.5 to 9.9 ounces - which is right at the upper size limit).
- Work the two halves into balls (the traditional technique is to shape them the same way Italians prepare fresh mozzarella balls).
- Place the two balls into one or two sealed containers - the dough balls will double in size, so make sure they have enough room.

- Let the dough rest for 24 hours at room temperature.
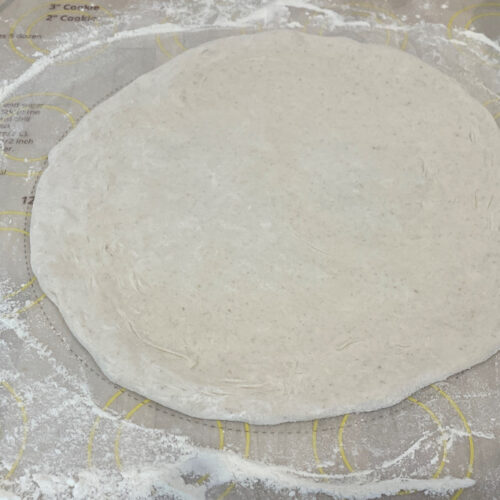
Stretching the Dough
- After the second fermentation, the dough will have become extensible (meaning you can stretch it) but not very elastic.
- Put 1 tablespoon of semolina flour on your work surface

- Remove one dough ball from its container onto the floured work surface.
- Stretch the dough by hand from the center to the edge. Create a round shape but ensure that the edge of the crust is about 0.5" tall and 0.5" to 1" wide and the rest of the crust is very thin (less than two pennies, if you can).(If needed, add more flour to the work surface so the pizza does not stick, but do not use more than you need)
- With this recipe (which makes two 9 ounce pizza dough balls), you should be able to make up to a 12" pizza.
- Put 1 tablespoon of semolina flour and a pinch of cornmeal on your pizza peel (so the dough will not stick when launched into the oven).

- Transfer your dough to the pizza peel.
- You will want to quickly apply your toppings and get the pizza into the oven before the dough sticks to the peel.
- Launch the pizza into the oven on the hottest part of the stone without being in the flames.
- Before rotating the pizza, make sure that Rotate the pizza one quarter turn every 45 seconds. Generally, the pizza will be done in 6 minutes or less. So watch it closely!

- Remove the pizza from the oven and let it rest for about 3 minutes.

- Cut and serve immediately.

Notes
Conventional Oven option:
- If you are going to cook this in a conventional oven, you'll want the highest temperature you can get the oven to.
- If you have a pizza stone (or pizza steel), that's going to help a lot in getting the most authentic crust. If not, a pizza pan (or cookie sheet) will still turn out a great pizza.
- You can either start the pizza on a pan (or cookie sheet) and transfer it to the stone after about 10 minutes (when the crust is firm enough to be safely transferred). At this point, turn off the oven and let the pizza cook on the stone for another 5 minutes. Remove and let rest on a cutting board for another 5 minutes before cutting and serving.
- Alternatively, you can start by launching the pizza directly to the pizza stone in your oven. This is more tricky and you might want to practice with some dough with no toppings!
Nutrition
Calories: 818kcalCarbohydrates: 171gProtein: 24gFat: 2gSaturated Fat: 0.3gPolyunsaturated Fat: 1gMonounsaturated Fat: 0.2gSodium: 1757mgPotassium: 253mgFiber: 6gSugar: 1gCalcium: 40mgIron: 10mg
Tried this recipe?Let us know how it was!